Rescue Knots
Importance of Bowline and other knots
How to tie Bowline knot and even the query to learn other rescue knots are the concern of first responders as they use them In emergency situations to secure ropes and make anchor points. These knots are stronger and more reliable and easy to tie, and can bear heavy loads.
These knots are good for ensuring the safety of both the rescuers and the individuals being rescued. Rescue knots are important tools for rescue professionals such as firefighters, search and rescue teams, and mountaineers.
Importance
In any emergency situation, time is essential for rescuing the people. The use of the right knot makes a great difference in the ultimate result of the rescue operation. The following are the main reasons to tie a proper rescue knot in any operation;
- Overall Safety: Rescue knots are the tool that helps to provide maximum safety during any emergency operation.
- Diversity: During any emergency operation, the scenarios remain changing, like hoisting victims, making anchors, and establishing belay systems. Their versatility makes these knots widely useful during diverse challenges.
- Reliability: When lives are at stake, rescuers always need to have complete confidence in their tools and equipment. These rescue knots are well known for their reliability and load-bearing capacity.
- Ease of Use: In high-pressure emergency situations, simplicity is of vital importance. Rescue knots are designed to be tied quickly and easily, even with gloves.
Let us have a quick overview of some of the rescue knots and firefighter knots that are well-known in operations.
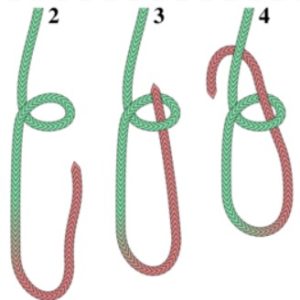
Bowline
The Bowline knot creates a strong and reliable loop that is often used in rescue operations for joining ropes to harnesses. It’s a versatile knot that is easy to tie and untie, even after being subjected to a heavy load or tension.
How to tie a bowline knot?
- Just create a small loop with the working end of your rope. You imagine, for ease, the working end as a rabbit and loop is a hole.
- Then pass the working end of the rope through the loop from underneath, and pull it up through the hole.
- Take the working end of the rope and wrap it around the rope.
- Then bring the working end back beneath the tree hole, going under the standing part.
- Finally, tighten the knot by pulling the standing part and the working end simultaneously.
How to tie a slip knot?
The Slip Knot is a common knot that rescuers use in different situations of rescue operations. The most common purpose of this knot is to create a temporary, easily adjustable loop. In subject to heavy load or tension, this knot may become too tight. Therefore it should be carefully used.
How to tie a Slip Knot; Easy steps
- Start by creating a small loop with the working end of the rope in your left hand. The working end should be on top, forming an “S” shape with the rope.
- With your right hand, reach through the loop from underneath, grabbing the working end of the rope.
- By pulling the working end through the loop, create a larger loop.
- Grab the larger loop with your left hand and then use your right hand to pull the working end.
A figure of Eight Knot
The Figure Eight Knot is one of the most fundamental and widely used rescue knots. It is simple to tie and provides excellent security, making it suitable for a range of applications, including attaching ropes to harnesses, creating anchors, and preventing the rope from sliding through a device or carabiner.
To tie a Figure Eight Knot:
- Take the working end of the rope and form a loop by crossing it over the standing part.
- Pass the working end through the loop from underneath.
- Bring the working end around and back through the original loop, following the same path.
- Tighten the knot by pulling the working end and standing part simultaneously.
The Figure Eight Knot creates a strong, reliable loop that is easy to identify and inspect visually, providing confidence to both the rescuer and the individual being rescued.
Clove hitch
The Clove Hitch is a versatile knot that rescue professionals commonly use in operations. The most common use of this knot is for attaching a rope to an object, such as a post, tree, or carabiner. The Clove Hitch provides a temporary anchor point or can be used to secure a rope in place temporarily.
To tie a Clove Hitch:
- Pass the working end of the rope over the object.
- Cross the working end over the standing part of the rope.
- Pass the working end under the standing part, creating a loop.
- Bring the working end over the object again.
- Pass the working end under itself and through the loop.
- Tighten the knot by pulling both ends of the rope.
The Clove Hitch is a reliable knot that can be easily adjusted or untied, making it a valuable tool in various rescue scenarios.
Prusik Knot
The Prusik Knot is an essential knot for ascending or descending ropes. It is often used in rope rescue operations, climbing, or rappelling. The Prusik Knot creates a loop that grips the main rope when weight is applied, allowing the user to slide the knot along the rope while maintaining control.
To tie a Prusik Knot:
- Take a smaller diameter rope or cord and create a loop.
- Pass the working end of the loop around the main rope.
- Bring the working end back through the loop, forming a girth hitch around the main rope.
- Repeat the previous steps with a second loop, creating a double Prusik if desired.
The Prusik Knot provides a reliable and adjustable attachment point that allows rescuers to maneuver safely along a rope.
Butterly Knot
The Butterfly Knot, or Alpine Butterfly Knot, is a knot for creating a secure and non-slip loop in the middle of a rope. The use of this knot is common in rescue operations for creating anchors, attaching equipment, or equalizing loads. The Butterfly Knot is easy to tie and untie, even after being subjected to tension or heavy loads.
How to Tie a Butterfly Knot:
- Create a bight in the rope, with the working end crossing over the standing part.
- Form a loop by bringing the working end behind the standing part.
- Pass the working end through the loop from underneath.
- Repeat the same steps with the working end, passing it through the loop from the opposite direction.
- Tighten the knot by pulling both ends of the rope.
The Butterfly Knot creates a secure and reliable loop in the middle of a rope, ensuring the stability and safety of rescue operations.
Double figure of Eight knot
The Double Figure-Eight Knot is for creating a secure and non-slip stopper at the end of a rope. Its common use includes preventing ropes from slipping through devices or creating secure attachment points. This knot is again a stronger version of the Figure-Eight Knot and is for use in situations where extra safety is needed.
How to tie a Double Figure-Eight Knot:
- Create a small loop near the end of the rope.
- Pass the working end of the rope over the standing part.
- Bring the working end back under and through the loop.
- Repeat the same steps to create a second loop.
- Tighten the knot by pulling the working end and the standing part simultaneously.
The Double Figure-Eight Knot provides a secure and non-slip stopper, ensuring the efficiency and safety of ropes in rescue operations.
Scaffold knot
The Scaffold hitch, which is also known as the scaffold knot, is used to hold cylindrical objects like trees or pole. Within any rescue operation, this knot is good for creating anchor points or attaching ropes to any object.
How to tie a Scaffold Knot:
- Pass the working end of the rope around the object.
- Cross the working end over the standing part.
- Pass the working end under the standing part.
- Bring the working end back over itself and through the loop created.
- Tighten the knot by pulling the working end and the standing part simultaneously.
Monkey’s Fist
The Monkey’s Fist is a decorative knot and is useful for the usage of weight or a throwing object at the end of a line. Throwing lines or ropes over a distance, and creating a weighted end for throwing accuracy is the common use of this knot. The Monkey’s Fist provides a reliable and easily throwable object to first responders for the safety of rescue operations.
How to Tie a Monkey’s Fist:
- Create a bight in the rope and hold it in your hand.
- Take the working end of the rope and wrap it around your hand, forming multiple wraps.
- Pass the working end through the middle of the wraps.
- Continue wrapping the working end around the wraps.
- Pass the working end through the wraps again.
- Tighten the knot by pulling the working end and the standing part simultaneously.
The Monkey’s Fist creates a weighted and throwable object, allowing for accurate throwing in rescue operations.
Cat’s Paw
The Cat’s Paw is for creating a temporary grip on a rope or a cable. It is useful in rescue operations for pulling or dragging objects, securing equipment, or constructing anchors. The Cat’s Paw provides a quick and easily adjustable solution, ensuring the efficiency and safety of ropes in various situations.
How to Tie a Cat’s Paw:
- Create a bight in the rope or cable.
- Pass the working end of the bight under the standing part.
- Bring the working end over the standing part and through the bight.
- Repeat the same steps on the other side of the bight.
- Tighten the knot by pulling the working ends and the standing part simultaneously.
The Cat’s Paw creates a temporary grip, promoting efficiency and safety in rescue operations.
Blood Knot
The Blood Knot is for joining two ends of fishing line or similar diameter ropes. It is useful in rescue operations for creating secure and reliable connections between ropes or cords. The Blood Knot provides a strong and stable join, ensuring the efficiency and safety of ropes in various situations.
To tie a Blood Knot:
- Overlap the ends of the ropes or cords by a few inches.
- Take the working end of the first rope and wrap it around the second rope.
- Pass the working end of the first rope through the loop created between the two ropes.
- Take the working end of the second rope and wrap it around the first rope.
- Pass the working end of the second rope through the loop created between the two ropes.
- Tighten the knot by pulling both ends simultaneously.
The Blood Knot creates a secure and reliable join between ropes or cords, promoting efficiency and safety in rescue operations.
Bowline on a Bight
The Bowline on a Bight is for creating two secure and non-slip loops in the middle of a rope. It is useable in rescue operations for creating load-bearing loops, rigging anchors, or constructing rope systems. The Bowline on a Bight provides strong and reliable loops, ensuring the stability and safety of ropes in various situations.
How to Tie a Bowline on a Bight:
- Create a small bight in the rope.
- Pass the working end of the rope through the bight from underneath.
- Bring the working end over the top of the bight.
- Pass the working end back through the bight.
- Tighten the knot by pulling the working end and the standing part simultaneously.
The Bowline on a Bight creates two secure and non-slip loops, promoting efficiency and safety in rescue operations.
Leave a Reply